
Tutorial Index:
- Part 1: Creating Outline ⇐ you are here
- Part 2: Coloring the Skin
- Part 3: Applying Some Shading
- Part 4: Coloring
Wondering how those guys on the internet turn photograph into a nice cartoon-style picture? Eager to make one yourself but don’t know how to do it? Looking for an Adobe Photoshop tutorial on it but couldn’t find any that satisfies your need?
Search no more. You’ve already found it!
Now here’s how to turn your favorite photo into a cartoon photo.
Be aware though, a photo cartoonization process (or cartooning, some people may say) is a patience-demanding job. But the result is very much satisfying.
For this tutorial we will use a photo of Rihanna.
Here’s the original photo

And here’s the final result of this tutorial

First of all, download the original photo of Rihanna here.
And start to work.
Step 1: Preparing the Canvas
 1. Open the original photo in Adobe Photoshop. (In this tutorial I use Adobe Photoshop CS. I haven’t got other versions of Adobe Photoshop, but I guess the entire steps described in this tutorial can be applied on any version of Photoshop)
Note: On choosing the photo to be cartoonized, choose a clear and sharp photo with the face of the person clearly seen. Blur, out of focus, or under-exposed photo is a bad choice. The larger the resolution of the photo is the better
 2. On the ‘Layers Palette’, drag and drop the ‘background’ layer to the ‘New Layer’
 ![]() button to duplicate it.
button to duplicate it.
Rename the new layer to ‘original’. (To rename a layer, right-click on the name in the Layers Palette and select Layer Properties).
We will keep the original photo (the ‘original’ layer) intact in case something ”wrong’ happened in our cartooning activity and need the original picture.
 3. Lock this layer (click the ‘lock all’ button
 ![]() ), and turn the visibility of this layer off.
), and turn the visibility of this layer off.
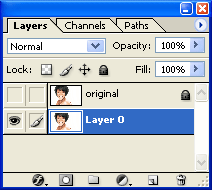 4. Double click the ‘background’ layer. Click ‘OK’.
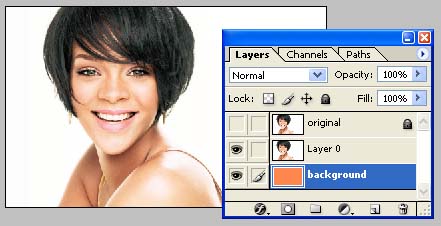
5. Create a new layer. Rename it into ‘background’. We will use it as background layer for our cartoon photo. Fill it with orange using Paint Bucket tool.

6. Move the layer to the bottom.
Now our layers will look something like this:
Step 2: Removing Unwanted Areas of the Picture
Isolate the object. Clear out all unwanted parts of the photograph. Use Pen Tool for this purpose. If you’ve never used this tool previously, I suggest you to take a look at Melissa Evans tutorial first.
Take the Pen Tool, create a path around the object (Rihanna for this case), load path as selection (ctrl + Enter), inverse the selection (ctrl + shift + i), cut (del), then deselect the selection (ctrl + D).
Note: You could use Eraser Tool, Magic Eraser Tool, or Background Eraser Tool which is simpler and faster for this purpose, but the result won’t be as professional.

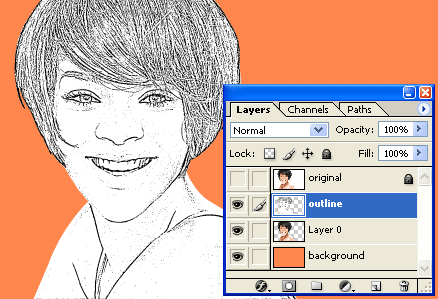
Step 3: Creating outline of the picture
Our next step is to create the outline of the picture.
 1. Copy the ‘Layer 0’ layer (drag and drop it to the ‘create a new layer’
 ![]() button).
button).
Rename it to ‘outline’.
2. Menu: Image :: Adjustments :: Shadow/Highlight…
Click OK.
This step is not a must. But most of the time it will improve the clearness of the outline.
 3. Make sure color palette is black for the foreground and white for the background. (Press ‘d’ if they’re not).
4. Turn the picture into outline using photocopy filter.
 menu: Filter :: Sketch :: Photocopy…
Set ‘Detail’ to 3.
Set ‘Darkness’ to 8.
Click ‘OK’
 The value for ‘Detail’ depends on the picture. Most of the time a value of ‘2’ gives the best result.
Experiment with this setting. The goal is to make the outline as detail as possible so we can recognize the result as Rihanna, but not over-detailed that the outline becomes ‘dirty’.
5. Turn the outline into solid black lines.
menu: Image :: Adjustments :: Threshold…
 Turn the slider right and left, experiment with it, until the preview displays the best outline you can get (a compromise between ‘detail enough’ and ‘clean enough’).
Click OK when you’re satisfied with the result.
That’s it. Now we’re done with the outline.
Here’s the result so far..
Next, we will apply some shading to give depth to the picture and then colorize it.
Go on to the next part of the tutorial.
Tutorial Index:
- Part 1: Creating Outline ⇐ you are here
- Part 2: Coloring the Skin
- Part 3: Applying Some Shading
- Part 4: Coloring

32 Comments
Sankaf
Jan 2023 at 1:55 pm479356
Israel
Nov 2020 at 6:07 pmThanks
bryan
Apr 2020 at 3:06 pmI love this, thank you very much, very good job! but you didn’t told about the famous prima cartoonizer!!! maybe it will help someone! https://primacartoonizer.com/Prima-Cartoonizer/
Kareem Tijani
Feb 2020 at 6:32 amPlease send me your WhatsApp number so I can forward some pics to you that u can help me to cartoonize it
I will be glad if u can do so
This my WhatsApp (+2349051605916)
Thanks slot.
Jibstar imagination
Jan 2020 at 4:11 pmI really want to know more about this cartoon stuff….
Add me on whatsapp @ 08113473840
emmanuel
Nov 2019 at 2:49 pmm using cc 2019 and hv failed to locate the sketch filter please help me
cartoonized
Dec 2019 at 7:23 amFilter :: Filter Gallery
or in the photoshop preferences -> Plug-Ins
check “Show All Filter Gallery Groups and Names” and then after restarting photoshop cc you should see it on the filter list.
Gabriel Gyimah Darko
Mar 2019 at 4:39 pmPlease can you turn my picture into cartoon if i send some to you.this is my whatsapp number +233 243695028
chinee gaba
Sep 2018 at 7:01 pmcan you help me? I need it for my finals project. Will be drawing it, i need a pattern/basis for me to copy it. pleaseeE? :((( It would mean the world to me.
collins
Jul 2018 at 3:21 amplease can you toon for me?
lemme ave your Facebook handle
or add me and message me
@O NO SE
Antonius
Apr 2018 at 10:21 amGod Bless You..
What a nice tutorial..
thanks.
Moses
Apr 2018 at 8:43 pmCan you cartoon me
Michell Barrett
Mar 2018 at 12:16 amcan i be cartoonized if i leave an image of me
Noxy
Nov 2017 at 11:17 pmthis is helpful.. thanks
best creation
Sep 2017 at 12:18 amguys send some pic to me mo help u do it
Diamond iare
Apr 2018 at 11:02 pmBest creation please I want you to teach me more on cartoonation
whatsapp 07063503498
Antwi Ayim Amos
Aug 2017 at 2:24 pmcan I get my picture done if I send it to you
Henry
Mar 2017 at 2:34 amPls can it be applicable in phones?
cartoonized
Mar 2017 at 12:22 pmThis tutorial is about cartoonizing a photo using Adobe Photoshop on desktop computer.
Thug
Mar 2017 at 4:17 pmPlease I’m using cc 2015 but couldn’t locate the sketch filter in my filter menu. Can u help me?
HAWHAW
Sep 2016 at 2:56 amNow give her giant boobs and it’s anime 🙂
niceguy
Mar 2018 at 12:13 amnice
Abdul malik
May 2016 at 4:44 pmCan i get on image of me if i send it to you
Escore Bassey
Jun 2017 at 10:17 pmI can get that done for you.
taiwo
Mar 2016 at 2:36 amits awesome …. I want one!!
Bennyqibalart
Jan 2016 at 1:19 pmBriliant technique.. Also check my tutorials too youtube.com/bennyqibal
Rubi
Nov 2015 at 12:10 pmcan u make one of me if I email you a picture of me??? it would mean the world to me!! <3
Wisdom
Apr 2018 at 2:18 pmYes dear
Send it to my email
Wisdomisaiah24@gmail.com
Gabriel Gyimah Darko Junior
Mar 2019 at 4:42 pmplease this is my whatsapp number +233 243695028,please whatsapp me so that i can send some of my pictures to you for you to do some for me
pema dechen
Apr 2018 at 9:11 pmcan you too help me in converting some images of mine into cartoon form…i need it for my major assignment…plez
twisun
Apr 2018 at 7:25 amsure
Steveo
May 2018 at 12:13 amSend me your facebook handle or instangram handle to my e-mail account at Officialsteve00@gmail.com. I’ll get back to you am into cartooning of photos and graphic designing